DIY Canister filter... any thoughts?

Would love to see a picture if you ever got this working. After this thread and a bottle of wine I got creative with some bits of sponge, a few Chinese takeaway boxes and some tubing, had a go at making my own version of a wet/dry/sump filter and actually managed to create one of the most ugly monstrosities ever to be devised by mankind...

On the positive side however I did discover that you can pump a really impressive amount of water out of a tank and up a vertical tube just by the sheer power of air bubbles from a fairly modest aquarium air pump. (the right tube diameter is the key)
 
The great thing about filtering an axolotl's tank with a sump is that they really don't like that much flow, so you would think a small $15 water pump would be more than enough flow for them. I've been really tempted to make one of these from time to time, but until my canister filter breaks on me I'm not gonna replace what's not broken.
 
I think that if you can make this work then go for it! and then share all of your info with the forum lol

Hey, look at the Dyson guy, he revolutionized vaccums and it only took him like 1,700 prototypes :)

def. let us know how everything goes
 
Sorry guys!
Not much progress to report as of today. I have got a few things together- some large PVC pipe- plywood and suchlike but as its this time of year everywhere is closed- even the second hand building material place( which is kind of a gold mine for me- I only just found it :grin: )

I have got this 150mm diameter PVC pipe ( it was an off-cut at the local plumbing place-cost me $2 AUD) and I am thinking I am going to make a canister-type filter with it- as I have limited space under my current tank stand I could only get a 30L sump under one side of it ( the other side was going to be for a small cooling tower I am going to build for the tank) but it would be a tricky build to do on the cheap. I was thinking of completely sealing up a plywood box basically, with some acrylic on the facing side with a removable plywood cover- the acrylic was cost prohibitive, though...

Hmmm, just thought- I could probably get some glass, from aforementioned building seconds place, fairly cheaply... I might actually return to this idea.
Anyway I was only going to get approx 9 L with this canister filter and with a heat gun and and some carving tools I was going to give it the appearance of tree bark ( thanks to one of sludge munkey's inspiring posts) and with the plywood, make it look like a tree stump basically. I thought that could look quite good, what do you think?

I've been a bit held up with uni, and now family obligations due to Christmas- this weekend I am heading off to the beach for a week with my girlfriend and her family- so after that, I plan to get to it and finish this thing- then I can post some results and pic's up for you guys.
I am sorry that I have been so slack with it- its just been hectic in my brain about it- how to build one- not only cheap and effective, but attractive as well.

Also, morphy! I would like to hear some more about this air filter pump- how did you place the air-line in the sump to get the water travelling up the tube to the tank- what was the diameter you used? Was it noisy? This could eliminate a sizeable portion of the cost- the pump!

Anyway, I have been researching cooling towers and I think that inline with a filter I could get some serious evaporative cooling going- more than thermoelectric devices for sure!
Here is a basic pic of said idea:
need a small pump in the blue, obviously- although the air pump idea would be a much better option if I could get it working- hot intake is coming from the filter
 

Attachments

  • cooling tower idea2.jpg
    cooling tower idea2.jpg
    54.3 KB · Views: 5,079
Last edited:
I made a quick version of it and posted a video on youtube here: Apologies I just now quickly rigged it in 3 minutes, you can easily improve on the version shown here.
YouTube - VIDEO0019.3gp

Here is a couple of pics ... really simple. (The other end of the small tube is plugged into the air pump)

Another good advantage of this method is that you don't add any extra heat with an impeller / powered water pump.
 

Attachments

  • IMAG0352.jpg
    IMAG0352.jpg
    62.8 KB · Views: 523
  • IMAG0353.jpg
    IMAG0353.jpg
    74 KB · Views: 355
Last edited:
Double posting to add more info -- The rest of the sump I tore down (it just looked too messy). This is only the part of it I used to raise water into the top. I just cut a hole in the lid of the top takeaway carton and fed the big tube (with airline in) into it and had a second smaller hole cut in the top to allow the air line to come back out and down to the valve. I sealed the tubes into the holes with silicon sealant.

I've taken the liberty of modifying your cooler sketch to show how you might possibly incorporate this to your own idea (attached)

It can raise water to a respectable height, I have a theory that the key is making sure the tube is not wider than the air bubbles so that water is forced upwards and cant escape round the edges of the bubbles.It also should be wide enough so as not to restrict the flow. Bit of a tricky ratio to get by guesswork but you can experiment. At one point I tried making tubes by cutting up plastic lemonade bottles and taping them to make different diameter tubes, although this pond hose with air hose running inside it seemed to work best for me. If I could have made a suitable box that wasn't completely ugly I might have gone with it, I might have another go at it sometime.
 

Attachments

  • coolerv2.jpg
    coolerv2.jpg
    61.1 KB · Views: 15,644
Last edited:
There are some great ideas in this thread. I think that the airlift idea for a return is a fantastic and simple, your helping to cool the water and your airating it too, without even needing to plug anything extra in if you already have a air pump.
 
I would have to agree with you there chris, thanks morphy! that is an awesome idea- thanks for the video as well it really helped with my understanding of the concept- I am a visual learner I guess :) .
 
I would have to agree with you there chris, thanks morphy! that is an awesome idea- thanks for the video as well it really helped with my understanding of the concept- I am a visual learner I guess :) .

My pleasure, I love tinkering and experimenting. I think I am what is technically referred to as a bodger :D
 
Just a quick update on my filter build- got some glass cheap from the place I talked about earlier- and a quick word of warning to anyone following in my footsteps; MAKE SURE YOU DONT GET SAFETY GLASS!!!! you cant cut it like regular glass- it just shatters, and you spend the next half an hour picking up the pieces and vacuuming.

Was not fun.

anywho off to work so I will get to it tomorrow.
 
Hey all! Finally have some progress to report on my DIY filter.
So I went for the sump or wet/dry filter, instead of the canister- which means that I have a spare piece of PVC pipe to experiment with, later on :).

So, basically it will be a glass and wood creation- a wood base and top with removable ply sides. so far I have managed to build the base and silicone the glass sides and bottom together. I need to put the top rim of wood on it and also make the lid.

Oh! And put the glass dividers into it, as well as a general clean up of the glass and some shellac on the wood. But here is my progress so far:
 

Attachments

  • DSCF0400.jpg
    DSCF0400.jpg
    390.1 KB · Views: 781
  • DSCF0403.jpg
    DSCF0403.jpg
    40.7 KB · Views: 850
  • DSCF0404.jpg
    DSCF0404.jpg
    57.4 KB · Views: 1,947
Last edited:
hey just to warn you use 1" pvc pipe for the overflow. I havn't made an overflow in forever, and recently tried. I used 3/4" and it may just be that I used a different build than I did last time but it is so slow.
 
Alrighty, guys and girls!

I am nearly done with this filter! will be posting up pics very soon!

I am having some problems with the overflow box- Carson, can you (or anyone else ) help me out here?

To maintain the siphon, I will need to have separate compartments in both boxes (inside the aquarium and outside) that the tubes of the siphon rest in, yes?

So the water flow should go something like this?

pump pumps water into aquarium
aquarium water overflows into first compartment of overflow box (inner)
Water overflows into siphon tube compartment- is sucked up.
water exits into outer box siphon tube compartment then overflows into drain compartment
water is drained into sump- pump pumps water back up!

is this about right?

Thanks everyone!
 
SO! Here we go! My completed (or very near to) DIY Sump or wet/dry filter!

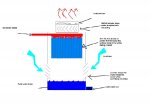
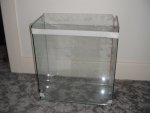
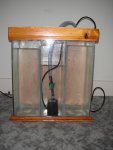
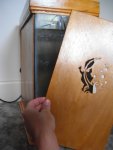
So the first pic is the filter on its side with with the cover removed.
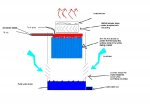
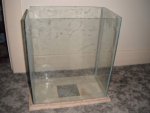
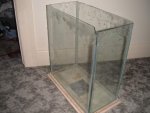
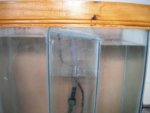
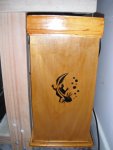
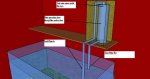
As you can see from the second and third pictures the filter's layout is a bit odd: the return pump is in the middle and the refugium is on the left while all the filter media will be going on the far right- if your looking at the first picture!
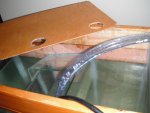
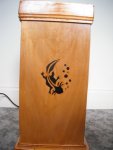
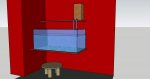
This is because of how it fits under my tank stand (which I have yet to shellac, as you can see from the last pic), which is lengthwise; this is because I wanted to be able to check the refugium easily if I needed too- this layout accomplishes that.

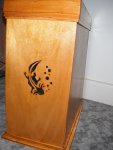
The front of the filter has a axolotl design cut from it. I thought i added interest, plus I will be putting some ultra-bright, blue LEDs in, so the plants I plan on planting in there might have a chance to grow! :)
All of the side panels are removable and slot-in up the top rim, so I can look in on it from time to time :).

The base is made from some off-cuts of ply I had laying around- the top rim from these $2 weather boards tha I cut to fit.
So I should probably put a price list up so here it is:

Glass Cutter: $12
Glass total: $30 I cut most of it myself; but caved and got some professionally done for me- namely the slide for the water to traverse the middle section.
Ply: Nada, already had some- probably about $6 worth there though.
Weather boards for Rim: Nada again, already had them but were $2
Shellac: $14
Methylated Spirits: Zip; had some on hand $4 a litre bottle
Silicone: $8: This was done with economical use of one tube, plus half of one i already had.
Tubing: Already had some vinyl tubing cost me about $6 ? last year sometime?
Ply for Top and Sides: $7 - one sheet got me all I needed.
Return Pump $35- this was the killer, Sorry Morphy, I needed to pump the water 120cm- the airlift idea was great, but not enough lift. :( Its only an 16W one, so fingers crossed on the water heating dilemma.
So in total- without filter media,

Grand Total!: $106 AU

... Well, not too bad I suppose... the canister filter from my LFS was $120

So add in, what, $20 for some filter wool and noodles? Not too bad at all!
(anyone got the lowdown on cheap filter media? :) )
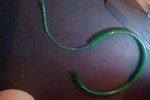
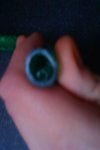
Oh! the overflow! made out of spare tubing and some apple juice and milk containers! Works great so far! cost me nothing except some Araldite epoxy resin which I already had- again. :) I love Araldite!

So, Hope you all like it! I will post some more pics when it is up and running properly.
 

Attachments

  • DSCF0406.JPG
    DSCF0406.JPG
    301.1 KB · Views: 1,804
  • DSCF0408 - Copy.JPG
    DSCF0408 - Copy.JPG
    291.8 KB · Views: 559
  • DSCF0412.JPG
    DSCF0412.JPG
    278.3 KB · Views: 493
  • DSCF0415.JPG
    DSCF0415.JPG
    277.1 KB · Views: 358
  • DSCF0416.JPG
    DSCF0416.JPG
    294.2 KB · Views: 383
  • DSCF0419.JPG
    DSCF0419.JPG
    229.9 KB · Views: 442
  • DSCF0420.JPG
    DSCF0420.JPG
    288.7 KB · Views: 708
  • DSCF0425.JPG
    DSCF0425.JPG
    284.9 KB · Views: 536
Last edited:
A lot of this is way over my head but it looks amazing! I love the axie motif! :D
 
Thanks Siona! I really appreciate it! :D
Probably more writing now that I've gone and edited it. Sorry, had to go find my receipts!
 
That's outstanding and beautifully crafted!

I love the way you've used glass to show the inner workings. (Will the wood go all around it or will you leave one side on display?) For DIY media I've seen people use pieces of unglazed terracotta, pebbles, gravel and sponge. With the looks of the equipment you've made you would need to fill it with suitable media which doesnt spoil the looks.

I hope you can post up a video of it action soon (cant wait)... When I move into a bigger place and get bigger aquariums I'm definitely going to have a go at something like this but I'll be lucky if I can craft anything as beautiful.
 
Last edited:
Thanks so much morphy! Thanks for your kind words and all your help and ideas along the way- I am only sorry that I didnt find a way to use your airlift idea. :(
As for the wood- it does go all the way around, but all four sides are easily removable. They just sit on the bottom and are in the groove up the top.
Will post up a video of it soon! :D
 
You've got my old grey cells being all creative again now ... I've had some more thoughts RE making a kind of trickle filter which were inspired by your work. I'm thinking, if I get a nice wide piece of tube, something like this kind of stuff ...
4c01_35.JPG


(Or even PVC drainpipe would do), sealed at top and bottom (except for holes for the tubes and floors between the different media types (or possibly tubes within tubes)) Then I can use that to house a range of filter media. I could make water trickle down into the top, percolate it's way down (which would mean 'super turbo powered' aerobic respiration for the good bacteria) and then have it trickle back into the tank again.
The whole thing could then be housed inside a nice wooden box ...

I knocked up some ideas on Google Sketchup (which I don't recommend using for this kind of thing unless you're a pro, it took *** ages, would have been much quicker and easier with pencil, paper and a scanner!)
 

Attachments

  • closeUpView - Labeled.jpg
    closeUpView - Labeled.jpg
    50.7 KB · Views: 8,837
  • finishedView.jpg
    finishedView.jpg
    30.1 KB · Views: 3,481
General chit-chat
Help Users
  • No one is chatting at the moment.
    There are no messages in the chat. Be the first one to say Hi!
    Back
    Top