10 Gallon Castle for Tweakers w/ Photos & Instructions

Martin21114

New member
Joined
Aug 24, 2011
Messages
387
Reaction score
14
Points
0
Location
Maryland
Country
United States
Hopefully some of you will enjoy this. Besides rocking out with my axolotls, work, doing honey-do's, etc.. one of my hobbies is building aquariums (or little habitats) for my axolotls.

Some examples cam be seen:

http://www.caudata.org/forum/f46-beginner-newt-salamander-axolotl-help-topics/f48-axolotls-ambystoma-mexicanum/f59-axolotl-tank-set-ups-filters-substrate/89883-75-gallon-castle-build.html

http://www.caudata.org/forum/f1173-advanced-newt-salamander-topics/f6-vivaria-enclosures-product-reviews/f8-photos-pictures-enclosures-vivaria-etc/83198-direct-sr388-metroid-tank-preview.html


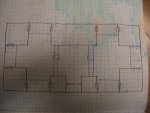
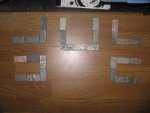
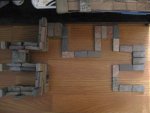
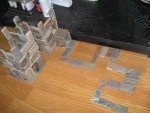
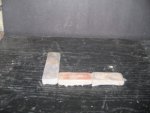
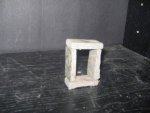
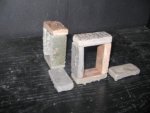
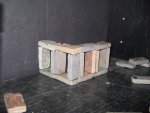
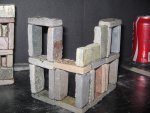
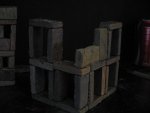
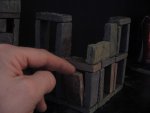
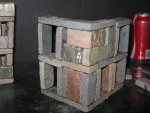
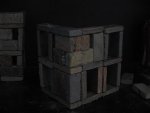
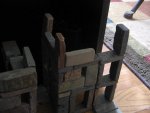
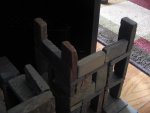
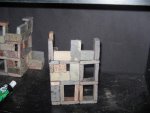
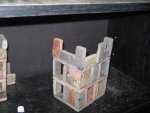
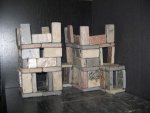
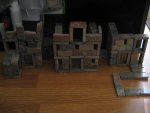
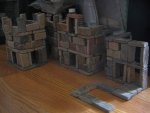
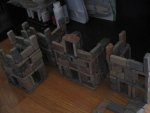
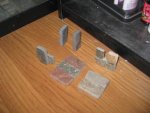
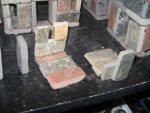
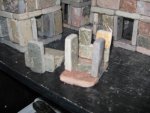
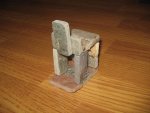
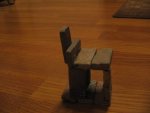
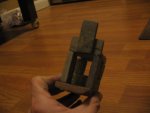
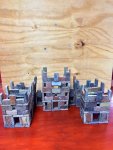
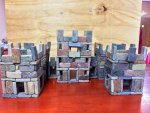
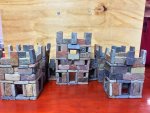
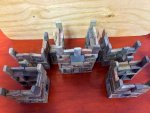
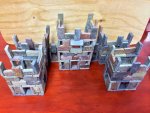
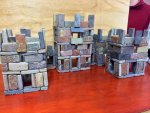
Anyway, I started making some decorations for a 10 gallon aquarium I am going to use to house juveniles who are about 1" long having just started to develop rear legs. I call them tweakers because of the way they twitch when eating BBS. I decided to make a castle for them, using 1"x2" slate mosaic tiles and DAP silicone (both from Home Depot). The tiles come in 12"x12" sheet for $9 and the silicone is about $5 per tube. I used 5 tiles & 2 tubes for a total cost of about $60. Below I will explain how I made it in case you want to make something similar.
 
Step 1 planning & lay out.

If you know what you want to build, great. Otherwise measuring the tank (10 gal is 10x20) and drawing a plan on graph paper can help a lot. There's an example below of an idea I am kicking around for a 40 gallon breeder so you can see what I mean.

Once you're ready to build, pop all the tiles of the mesh backing. I found the easiest way was to bend the sheet & grab the edge of the tile to pull it off. Try to remove as much of the glue off the back as you can. A file may be helpful. I don't think it is toxic (none of the "space monkey" axolotls living in a tank with a lot of glue on the tiles have died), but it turns bright white and looks crappy.

Lay out the blocks to make a footprint of what you are building. This particular one is 5 structures with connecting passages/walls. Once it is laid out you build up one piece at a time. That way it can be installed and removed in segments for cleaning or moving to another tank.
 

Attachments

  • Picture 037.jpg
    Picture 037.jpg
    66.2 KB · Views: 226
  • floor_plan.jpg
    floor_plan.jpg
    81 KB · Views: 230
  • step1a.jpg
    step1a.jpg
    76.5 KB · Views: 195
  • step1b.jpg
    step1b.jpg
    121.8 KB · Views: 250
Step 2, building a level:

I was about 1/2 done when I decided to start documenting, so you wont see how to make the whole thing, but once you know how to make one section, the rest is just more of the same.

The piece we're looking at goes in the right rear corner of the tank (the L shaped piece on the top right corner in the pics above). It only has 2 sides so you can see in from the sides and rear. Also so you can clean in it. I always leave at least 1 side open for this purpose. A sealed box would be a ***** to clean.

Take a look at the pictures below, they show pretty clearly how the structure is made. You use the silicone like mortar to hold the tiles together. Note the little box shape made out of 4 pieces. You will be making lots of these. Lots and lots, along with some variations. Stick them together according to the floor plan to make the bones of the first floor.
 

Attachments

  • step2a.jpg
    step2a.jpg
    71.2 KB · Views: 206
  • step2b.jpg
    step2b.jpg
    68.6 KB · Views: 220
  • step2c.jpg
    step2c.jpg
    66.6 KB · Views: 205
  • step2d.jpg
    step2d.jpg
    63.4 KB · Views: 204
  • step2e.jpg
    step2e.jpg
    85 KB · Views: 296
Stop to pet Bean when she looks all sexy. This is not optional.
 

Attachments

  • Picture 035.jpg
    Picture 035.jpg
    73 KB · Views: 215
Repeat.
 

Attachments

  • Picture 036.jpg
    Picture 036.jpg
    58.3 KB · Views: 183
Step 3, fill in the 1st level & make the 2nd.

Completing the first level only requires one block to fill in one of the doors (where there actually ins't a door, the madness!). You can see it's dramatic conclusion below. The 2nd level consists of 2 doors, this time only using 3 tiles each since top of the lower one is used as the foot of the upper, again see pics for clarity. The last thing to do is fill in the space between the doors. I like to use a mix of vertical & horizontal pieces to make it look more random. You can use smaller pieces to leave gaps for windows. A horizontal piece is placed over the walls, similar to the door cap, making the floor even for the next level. That completes the second level and you're almost done with the first structure!
 

Attachments

  • step3a.jpg
    step3a.jpg
    119.8 KB · Views: 208
  • step3b.jpg
    step3b.jpg
    54.4 KB · Views: 207
  • step3c.jpg
    step3c.jpg
    53.7 KB · Views: 499
  • step3d.jpg
    step3d.jpg
    113.7 KB · Views: 258
  • step3e.jpg
    step3e.jpg
    50.8 KB · Views: 212
Step 4 top it off with crenelations.

The last step is to finish the top. A few horizontal & vertical pieces are all that you need for crenelations (to hide your bowmen & crossbows of course!) to top it off. The finished piece is below. You can also see how it will look when it's connected to it's neighbor (note the pic is of the other side and was made slightly different, the tunnel was going to go between the structures instead of connecting them like the one we just built. I will change it later to match the new one).
 

Attachments

  • step4a.jpg
    step4a.jpg
    74.2 KB · Views: 220
  • step4b.jpg
    step4b.jpg
    73.3 KB · Views: 190
  • step3h.jpg
    step3h.jpg
    79.6 KB · Views: 429
  • step3i.jpg
    step3i.jpg
    83.8 KB · Views: 244
  • Picture 005.jpg
    Picture 005.jpg
    83.7 KB · Views: 231
  • Picture 028.jpg
    Picture 028.jpg
    66.1 KB · Views: 360
  • Picture 031.jpg
    Picture 031.jpg
    80.6 KB · Views: 215
  • Picture 034.jpg
    Picture 034.jpg
    69.6 KB · Views: 248
Step 5 connecting hallway/passage

Next is the hallway that connects the structures. The easiest way to make it is make the floor, rear wall, and roof separately then combine them once they've dried. You will need a total of 4.
 

Attachments

  • step5a.jpg
    step5a.jpg
    79.9 KB · Views: 189
  • step5b.jpg
    step5b.jpg
    79.8 KB · Views: 242
  • step5c.jpg
    step5c.jpg
    77 KB · Views: 219
  • step5d.jpg
    step5d.jpg
    98.7 KB · Views: 211
  • step5e.jpg
    step5e.jpg
    59 KB · Views: 194
  • step5f.jpg
    step5f.jpg
    60.2 KB · Views: 222
  • step5g.jpg
    step5g.jpg
    56.6 KB · Views: 224
Here are some pics of it all finished and out of the tank:
 

Attachments

  • photo 1.jpg
    photo 1.jpg
    191.2 KB · Views: 220
  • photo 1 (1).jpg
    photo 1 (1).jpg
    131.1 KB · Views: 209
  • photo 2.jpg
    photo 2.jpg
    132.9 KB · Views: 405
  • photo 2 (1).jpg
    photo 2 (1).jpg
    134.6 KB · Views: 169
  • photo 3.jpg
    photo 3.jpg
    113.1 KB · Views: 185
  • photo 4.jpg
    photo 4.jpg
    131.1 KB · Views: 196
  • photo 4 (1).jpg
    photo 4 (1).jpg
    126 KB · Views: 230
You know, the first time I saw this setup I couldn't help but think of how easy it would be to make a pillar that you could put plant substrate in and use as a very appealing "flower pot" of sorts.
 
General chit-chat
Help Users
  • No one is chatting at the moment.
    There are no messages in the chat. Be the first one to say Hi!
    Back
    Top